


xlaws27
-
Content Count
225 -
Joined
-
Last visited
Posts posted by xlaws27
-
-
okay after 1-2 days i finally finished my server side
and now im going to ask for help in my client side
is there a guide for that?
i was looking at client release but i don't know which one is for making client side
-
you only have to use only 1 version of SLN file depend on your visual c++ version.
if you version is 2008 then you use Hercules-9.sln and so on.
guide?
no, i'm not good at making guide.
hey dude hercules 9 10 11 is now working thanks to your help.. but aonther problem occured...

FINALLY IT WORKS!!!!!!!!!!!!!!!!!!!!!!!!!!!!!!!!!! THANK YOU FOR THOSE WHO HELP ME.!!
-
hmm...
maybe it just a habit... i'm not using any guide anymore for a long time
haha
sir please make an easy guide.. and btw
my hercules 11 and 12 is working
but my hercules 10 is not working even though i used c++2010 what happen?
-
9 is for 2008
btw you should choose "release" not "debug"
btw sir are you using that guide too?
or do you have an easy one guide?
-
Install all upgrade files to your SQL scheme.

what do you mean??? its my first time making a private server using hercules.. plz explain it tome im so noob
Guide from rathena:
Database Installation
It is now time to install the pre-installed database files that will allow your rAthena server to connect to your MySQL database and properly store data, such as characters, items, and guilds. Open up MySQL Workbench to the home screen.
[*]
[*]Double click "localhost" on the left under the "SQL Development" section. (Image)
[*]On the next screen (after a small loading bubble pops up), you will have access to the specific tables that were mentioned earlier. You will enter this screen in the future when you want to edit accounts and other things directly (not common).
[*]We need to install a new "Schema", this is like a folder where all the database tables are stored. Click the yellow cylinder looking thing in the upper left to create a new Schema. Name it "ragnarok" - NOTE! Lower case is important here, make sure it is exactly "ragnarok". The server collation should be "Server Default".
[*]Click "Apply" to create the Schema. A window will pop up with the actual commands that are going to take place; click "Apply" again to finalize your order.
[*]Now right click 'ragnarok' under "Object Browser" and click "Set as default schema", a line will appear through it telling the browser that any commands you make now will be ordered to that Schema.
[*]Next, click the button directly to the left of the one you just did, it says "SQL" with a tiny folder. Navigate to your rAthena/sql-files/ folder, and open the sql script file "main.sql".
[*]You'll see a bunch of code appear, these are commands that will tell the browser to create plain databases for your rAthena server. Click the yellow lightning bolt in the upper left hand corner to execute it and allow it to finish (ensure you click the first lightning bolt, the one without a cursor symbol or a magnifying glass over it).
[*]After it finishes, a bunch of executed commands will appear on the bottom of the screen. You can now expand the ragnarok schema to see a bunch of tables. (Image)
[*]Now, do the same thing for a schema called "log", but open and execute logs.sql instead of main.sql. Ensure the tables are there as well.
[*]Close the existing query tabs by hitting the "X" in the upper right of the tab. With the ragnarok tables still open, scroll down to the "login" table and RIGHT click it, then select "Edit Table Data".
[*]Here you'll see existing account information that players can log in with to make characters. If you remember, the first account is the server communication account and it has the default password that you were asked to reset earlier. For our example we chose "FishUser" and "FishPassword". Enter these in the "username" and "password" field. And then create your first GM account by clicking where the word "null" is on the row with a ' * ' and enter "2000000" for the "account_id" field, with a username and password that you like. For this guide we chose a username of "AthenaGM" and a password of "12345" and a sex of "M". To enable full administrator GM, just set the "group_id" to "99". Zero out everything else.When you are finished it should look like THIS.
[*]Hit the "Apply" button in the corner and then again when the code prompt appears. This should modify your tables. After it is done, you may close the SQL Editor by clicking the "X" on the tab at upper left corner. Hitting the "X" in the upper right closes the whole workbench. If you accidentally close it, just open it again.
[*]On the Workbench Home Screen, click "Manage Security" under Server Administration. Select "mysqld@localhost" and then click "OK".
[*]The next screen is the security window. You want to add an account that your server can use to access the databases that is NOT the root account, for enhanced security. Click "Add Account" in the lower left of the default screen.
[*]The login name needs to be "ragnarok", and the password we selected earlier for this guide is "Fish". The system will tell you how strong your password is... Fish is a very weak password. Leave the connectivity limit box defaulted and then hit "Apply" in the lower right. (Image)
[*]You'll see the account show up in the left above root. Select it and then click the "Administrative Roles" tab.
[*]Ensure that the "MonitorAdmin", "DBManager", "DBDesigner" and "BackupAdmin" are checked. Some of these will select themselves based on what you click. Then click "Apply". As a note, this step isn't entirely necessary but provides increased security. The simpler step is to just give the user all privileges by clicking the "DBA" option at the top. (Image)
[*]Click the "Schema Privileges" tab.
[*]In this tab, click "ragnarok" and then click the only available button, which is "Add Entry...".
[*]Leave "Any Host" selected and change Schema to "Selected Schemas". Then select the "ragnarok" schema and hit OK.
[*]At the bottom, hit "Select 'ALL'" to enable all database privileges for this Schema. This allows your ragnarok user to have access to all the tables in the schema of the same name. In other words, it allows your server to read/write the tables in the database you made. Make sure you click "Save Changes".
[*]Do the same for the "log" schema you made. When you are done it should look like this.
Congratulations! You have successful installed the MySQL database and are ready to run your server! See below for further adjustments.
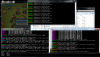
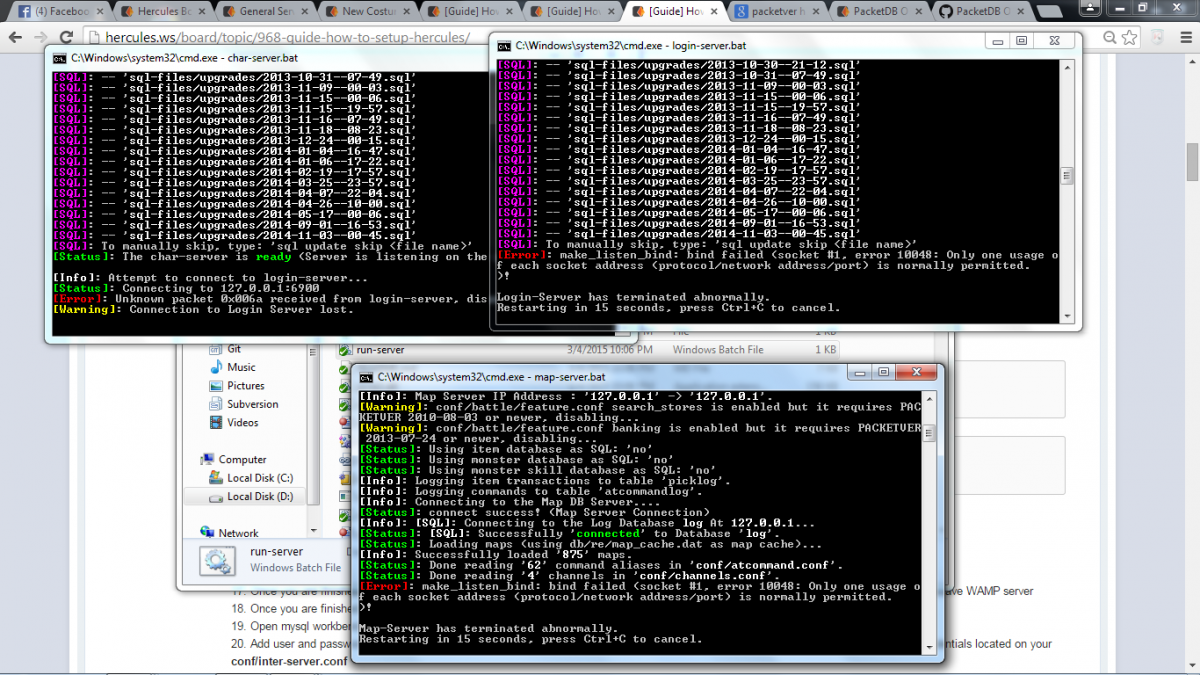
wait sir. i think the problem is this one..
i cant build it. it's the same on all hercules 9 10 11 12 (i used 2010 and 2012 to all of them)
is there another option ? like instead of "build" .

-
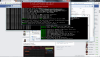
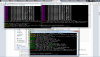
list all your errors here
giving some screen shots will help
here you go...btw sir. hercules 9 needs visual studio 2009 right?
but when i use visual studio 2010 on hercules 10 this also happens...
is there a another option for me to get those files in hercules without using "build" or c++?
-
can someone guide me in setting up hercules? this guide http://herc.ws/board/topic/968-guide-how-to-setup-hercules/ is too confusing for me
please help me ive been working for it for 2 days and theres alot of error please help me!! -
what do you mean??? its my first time making a private server using hercules.. plz explain it tome im so noob
-
i followed this guide http://herc.ws/board/topic/968-guide-how-to-setup-hercules/
i dont know why it is happening to me help me please!!
-
when i asked you i didnt know the difference of svn. but now i downloaded the latest hercules and now setting it up.. but the guide i saw was too confusing for me because it was my first time making private server
Hercules using GIT now, not SVN anymore i believe
oh i didnt know the difference of it . but i already obtained the updated hercules . no wonder the setting up was very different in svn.. thank you sir !!!! i cant wait to try your costumes
-
when i asked you i didnt know the difference of svn. but now i downloaded the latest hercules and now setting it up.. but the guide i saw was too confusing for me because it was my first time making private server
-
i hope someone could help me
-
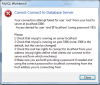
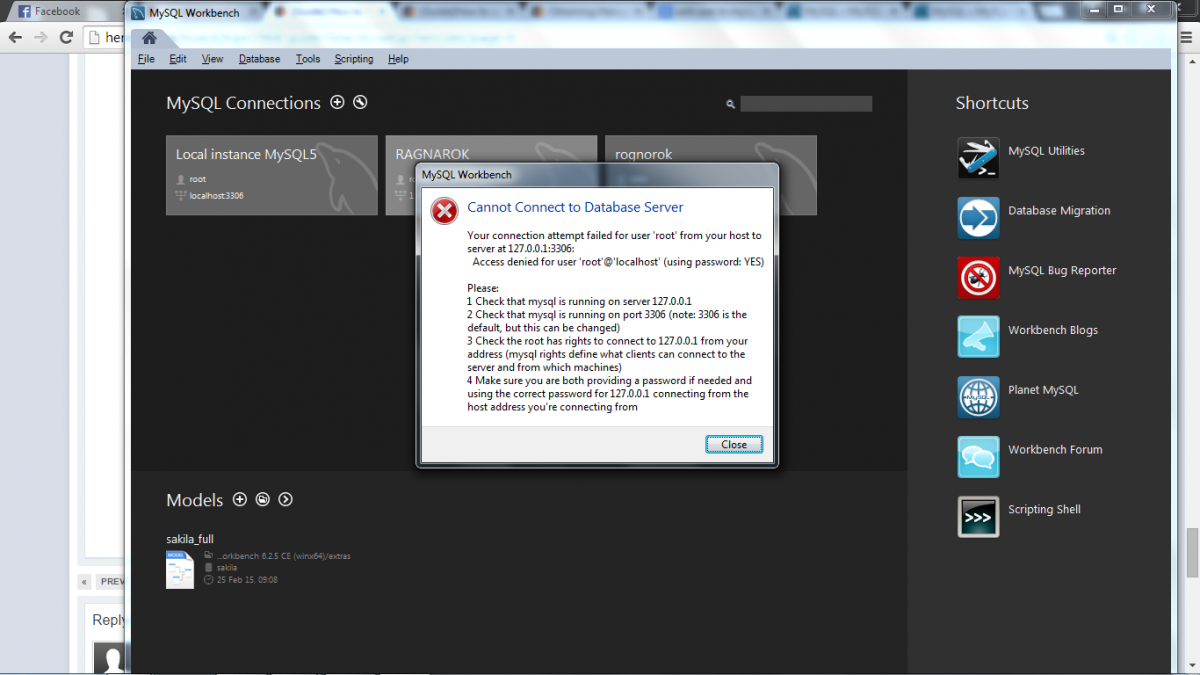
why is this happening? mysqlworkbench 6.25something is very different than yours
-
yep too old actually
sir can i ask for the link of the updated server files? i just started yesterday so i dont know how it works
 help me please
 -
may i ask???. the way that the costume scripted in itemdb2 was very different than mine
mine was .... 6189,Magic_Book_FB,Spell Book (Fire Bolt),3,0,,0,,,,,,,,,,,,,{},{},{}
6190,Magic_Book_CB,Spell Book (Cold Bolt),3,0,,0,,,,,,,,,,,,,{},{},{}are my serverfiles are old? -
best software for scripting?
-
@sir can u give me a guidelines? where can i find this onwhisper global?
-
- script Sample -1,{
OnInit:
set .amount, 40; // amount of item to shower
set .item_id, 7227; // item id to shower
set .map$, "prontera"; // map to shower
end;
OnMinute00:
while ( .count < .amount ) {
do {
.@x = rand(1,500);
.@y = rand(1,500);
} while (!checkcell(.map$,.@x,.@y,cell_chkpass));
makeitem .item_id,1,.map$,.@x,.@y;
set .count, .count + 1;
}
set .count, 0;
end;
}this is my first time making a ragnarok server.
this scipt is for item shower
i dont know where to add it..
please teach me step by step thank youuuu


please help me for my client side
in Client-Side Support
Posted
thank you so much that really helps me alot now im not confused with xdiff thingy..
but i dont have clientinfo.xml can you upload yours?
then ill just make a data folder then
copy the clientinfo.xml to the data folder