


Neo-Mind
-
Content Count
713 -
Joined
-
Last visited
-
Days Won
37
Posts posted by Neo-Mind
-
-
ah ok. M4ST3R's post confused me
 .
. -
patcher is done?
-
Nice Intro
 Welcome to Hercules
 -
nice find yommy

-
Happy Birthday Ind
+1 year +1 wiser
-
are u sure its capital K in packetkeys?
-
i think he means that when equipped and attacking instead of showing the custom bow's sprite his client is showing a regular bow.
which client version are you using?
-
Added screenshot
-
Shakto i think we should remove that diff since Old Login is not there anymore.
-
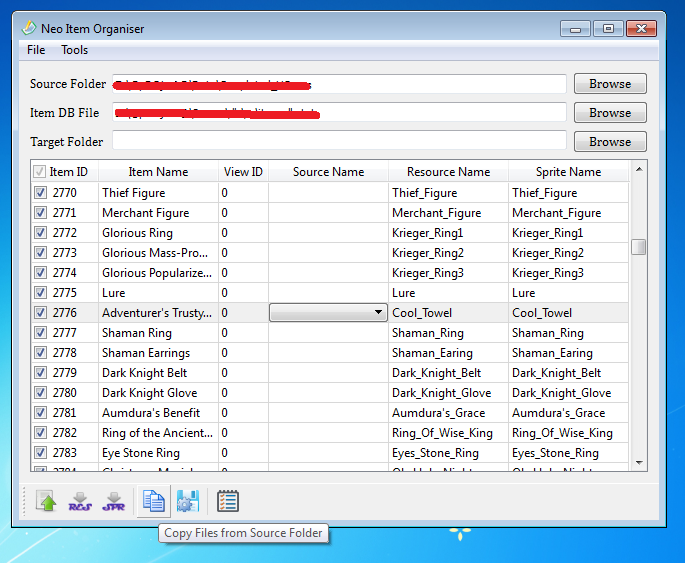
Purpose:
Organize the various files (Sprites, Act files and Image files) into their appropriate folders in an automated fashion.
Usage Instructions:
1) there are three inputs
i) Source Folder: Files required for each custom item is expected to be in a subfolder of this folder.
ii) Item DB File: Straight Forward. We load the required info from this file
iii) Target Folder: all the files will be copied to respective folder inside this one (sprite and texture folders)
2) Once you add the inputs click the Load Item DB button which will fill the table with the item id (checkmarked by default), name and view ids and some default values for the other three (source will be blank while sprite & resource is filled with dbname).
3) Click the checkbox of the items you want to work on, Select the source name and edit the sprite & resource name as desired.
4) Click the Copy button and all the files will be copied to proper folders.
5) Save settings button saves all the inputs and state of the table. so you can easily Reload it later. The tool also loads the save data when you open it.
6) In case you have iteminfo.lua or idnum2resnametable.txt already with the resource name you can make fill the table (Resource Names) by clicking the Fill Resource Button.
7) Similarly Sprite Name field can be filled from accname.lua & accessoryid.lua by clicking the Fill Sprite Button.
8) An addon as suggested by Yommy - Sanity Checker tool which checks for files and reports missing ones (Only the checkmarked items will be checked). Also checks for 24x24 8bpp format for item images - suggested by M4ST3R.
9) All the buttons below also have a menu entry at top.
10) Currently Weapon Equip Sprites are not being copied. Since i don't have an idea as to how to proceed with them - sprites would be different for different classes (e.g. Hunter classes v/s Rogue classes for bows). Any and all ideas are welcome.
11) All the buttons have tooltip describing its purpose. They show up immediately once you hover over them, so it shouldn't be difficult to use. But if you find it hard to use please let me know (I have some changes in mind).
Screenshot - to be updated
Currently I have placed the bottom buttons are in a detachable toolbar (easy with QT) so you can just drop it on any side of the window you want or just pull it out
.Status: Completed v1.0.1 - Waiting for suggestions for improvement
I had initially written some of the code for .NET4 but recently decided to drop it and use QT instead. If you see any bugs or have any suggestions or modifications in mind please let me know.Download Link v1.0.1 : http://www.mediafire.com/?ku7mhm376ik79g3
-
its gonna be a FAQ type of thing
-
-
-
-
LoL
-
Update:
Since many have issues with adopting .NET ( Either due to laziness or unsupported OS - Sad to see many are still using versions below WinXP SP3). I have decided to discontinue ROLeX in its current state.
Instead I am planning to rebuild it from scratch (Well sort of) using the QT framework & C++ with my Co-Conspirator - Vali
I would like to know everyone's thoughts on this before proceeding.
FYI: QT Framework is known to work only from WinXP onwards (So it might have issues with older version of Windows).
-
ah looks like the patcher implementation has started
nice -
so that makes mleo1.... Odin!!
-
Wunderbar!!
-
looks like these are packed exes. we need someone to unpack them first
-
oO BGM support?? uhh like BGM music playing in the background while logging in?
-
here's a thought can someone upload the pRO or idRO client here. maybe we can learn something from that.
-
i didn't see those files being referred in the 2013 clients . unknown did you make it work in a patched client? can you post the client here
-
well initially i thought md5 was required to be sent to the client as well but it is not.
I kept the checkbox because i was planning to add a preliminary check with the server to avoid wrong username/password being sent to the client - still don't have much idea how to implement this.
anyways currently the checkbox have no functionality

Neo Item Organizer[v1.0 Release Added]
in Projects
Posted
Updated First Post - added download link